Atmel AVR development on GNU/Linux
Roman Pavelka, December 5, 2010
Introduction
A microcontroller (µC) is a complete computer on one chip. It typically consists of a processor core, separated memories for program and data and some input and output peripherals. 8-bit Atmel AVR architecture is often used by hobbyists for its simplicity, low price and rich peripheral set.
ATMEGA8 µC can be clocked up to 16 MHz, there is 8 KB flash program memory, 1 KB RAM, 6-channel ADC (measurement device), USART and SPI (communication devices), timers and others…
It is available in hobbyist-friendly DIP28 package for about 5 USD in small quantities.
Required software
AVR binutils consists of essential tools as GAS assembler, linker and other utilities needed to obtain HEX file suitable to load to AVR µC. The great advantage is we don’t have to develop our software in assembly language, but The C Programming Language can be used. Simply install AVR-GCC compiler and AVR Libc to allow C programming.
Use your package manager for installation, additional informations can be easily found. Gentoo user will refer to detailed Gentoo Embedded Handbook.
The last required software tool is the downloader. It gets your program into the microprocessor. I’m satisfied with avrdude (AVR Downloader and UploaDEr).
Programmer hardware
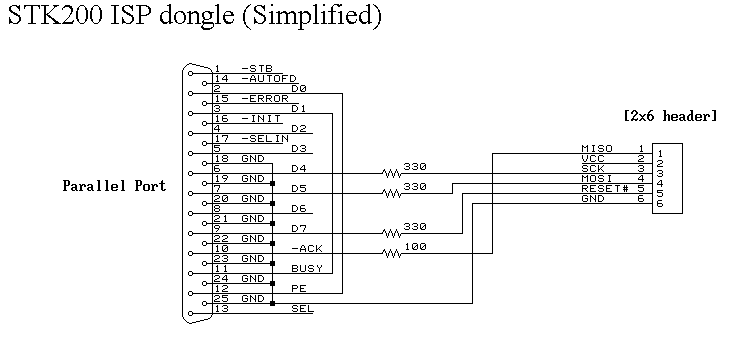
Physical program transfer must be done by some hardware programmer. There is a lot of commercial programmers: official STK500, USBtinyISP by Adafruit Industries and lot of others… It is easy to build your own. Buffered version should be used, but I found and build extremely simple STK200-compatible programmer for parallel port from figure 1 and I didn’t noticed any problems (I sadly can’t find author.). Keep the length of cable shorter than 1 meter. Of course, ISP header pinout should only fit to your circuit. Parallel port driver should be installed with properly adjusted permissions to /dev/parport0. In troubles or for more details refer to manual page of avrdude.

Hello, world!
The blinking led is the analogy to the clasicall “Hello, world!” program in the world of µCs. The wiring is on figure 2.

There is properly decoupled µC, power supply, switch between programing/reset and operating state, standard ISP programming connector and LED diode as output device on 0 of the port C.
Capacitors should be placed as near to decoupled devices as possible.
I can recommend to use a solderless breadboard for prototyping and testing purposes.
The code of blinking_led.c is here:
#define F_CPU 1000000
#include <avr/io.h>
#include <util/delay.h>

int main (void)
{
  DDRC=0b00000001; // set the PORTC, pin 0 as output pin, rest as input

  while (1) { // forever repeat
    PORTC=0b00000000; // switch the LED off,
    _delay_ms(1000); // wait a second,
    PORTC=0b00000001; // switch the LED on
    _delay_ms(1000); // and wait a second again.
  }

  return 0;
}
Here is Makefile:
PRG            = blinking_led
OBJ            = blinking_led.o
MCU_TARGET     = atmega8
OPTIMIZE       = -O1

# You should not have to change anything below here.

CC             = avr-gcc

# Override is only needed by avr-lib build system.

override CFLAGS = -g -Wall $(OPTIMIZE) -mmcu=$(MCU_TARGET) $(DEFS)

OBJCOPY        = avr-objcopy
OBJDUMP        = avr-objdump

all: hex

$(PRG).elf: $(OBJ)
        $(CC) $(CFLAGS) $(LDFLAGS) -o $@ $^ $(LIBS)

clean:
        rm -rf *.o $(PRG).elf $(PRG).hex

hex:  $(PRG).hex

%.hex: %.elf
        $(OBJCOPY) -j .text -j .data -O ihex $< $@

install: load

load: $(PRG).hex
        avrdude -p m8 -c stk200 -U flash:w:$<
Adjust first three lines for your project name and target µC. The last line is command to download the project to flash. m8 refers to µC ATMEGA8, stk200 to programmer hardware and should be adjusted too. List of possible programmers can be obtained by
avrdude -c list
and list of supported target µC’s by
avrdude -c stk200 -p list
By simply typing
make
the code should be compiled. Now set your circuit to programming mode by switching reset to ISP header and by
make install
download your program to the device. When the reset is switched to the power line, the LED has to blink with 2 second period. There is a lot of inspiration on the net. The most required technical informations can be found in datasheets of used devices.